I have been using an Easy Load Deluxe Balloon Apron from Twist Em Up for the last 6 months or so and really enjoy the fantastic design - in particular the easy load balloon strips. I have been dying to give it a go to try and make a similar one for a while and so with a rare child free morning I thought I'd give it a go!
I started with a couple of old jean legs I'd hacked off to make shorts last summer after the knees went! I'm glad I saved them (knew they'd come in handy!).
I cut a strip 45cm x 9cm
Then turned and ironed in the ends and folded it over. I then sewed along each side to make a strip around 3.75cm.
After trimming and turning in the ends of the strip I took a strip of the prickly edged velcro and sewed it on, then cut the furry side of velcro into 10X 9cm strips.
I then started to sew the furry strips on. I marked the centre in chalk and then 5 lines either side. As the strips wrap around the balloons they needed to be sewn on one side of the balloon space, so that made the chalk marks off centre. I have shown in the diagram and also how I positioned and sewed them with the chalk marks in blue and the centre in red. The velcro is sewn furry side up in the opposite direction to the space it will be covering (again see diagram showing velcro in yellow with slightly darker stitching.)
I then positioned and hammered poppers (well actually Dan hammered for me in the end!) on each side of the denim strip plus one in the middle. (You can just about see the one in the middle on this photo - there is also one at either end. )
I made 2 of these strips. Only one needed poppers though as I sewed the other directly to the Apron.
And to the Apron. I again up-cycled, this time with Dan's old work trousers. I had previously used the legs to make beanbags so they were coming in very handy! I cut out the back 'bottom' area in a rough apron shape, and also the pocket shown on the bottom right thigh area of the photo below which I thought may come in handy later!
This was positioned on top of my gorgeous Melody Miller Ruby Star Sparkle fabric - left over from the
pin-board I made for Angharad and Matt's wedding last week.
Both fabrics were laid as shown - good side up.
I sewed around the edges with a slight apron style curve, trimmed the edges, and then flipped the Melody Miller fabric inside out.
Ta da!
Dan helped with hammering again as I sewed the top popperless strip to the top of the apron and then the poppers matched up slightly below this strip in the centre and either sides so the first strip I made could snap on.
I got excited at this point and filled it with balloons before I could take photos! Oh - remember that pocket I chopped off Dan's trousers? That was sewn to the front of the fabric along the sides and bottom. The top was not sewn up so it could function as 2 pockets - both inside and behind. I also sewed on more denim strips as waist ties.
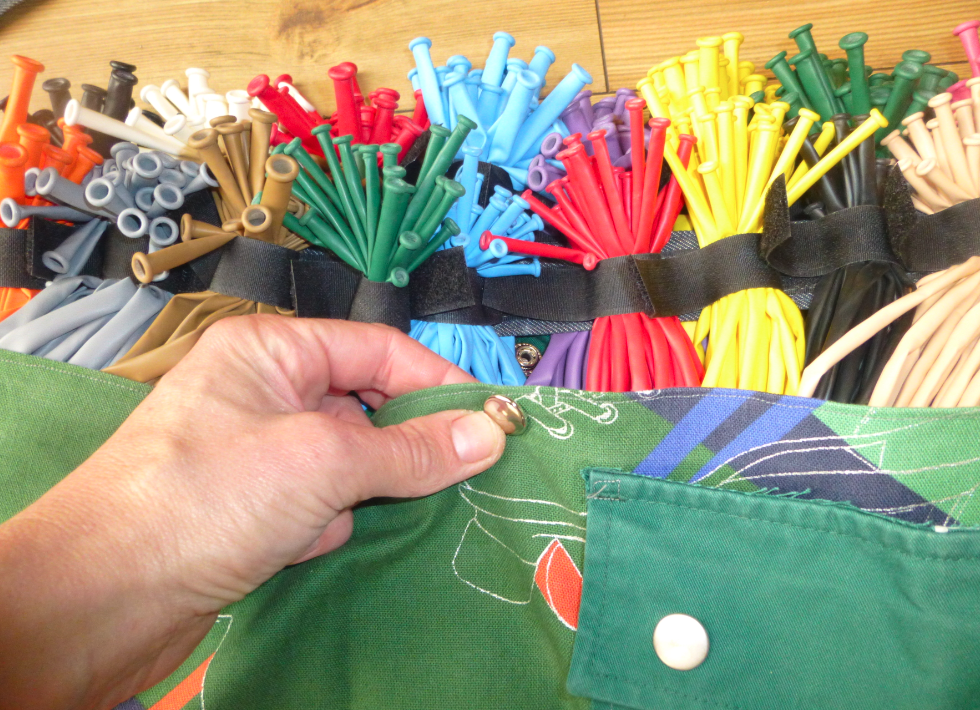
You can see below how the balloons are kept in place with the velcro strips. It is such a clever design as each velcro can take up to 50 balloons but still keep them tightly in place when you are down to your last 5 or so.
Here is also shown how the strips popper on. The second row needs to come off and on, so you can load up the first strip.
The large pocket of the apron needed to be loose and big as to be able to fold all the balloons in once they are secured with the strips. After that however, I wanted the pocket a little tighter which is why I added a popper in the middle of the bag as shown. (The Twist Em Up apron has zips down each side which make loading even easier, but I was after more of a quick project today!)
I then got even more carried away and made an extra pocket for the side and hooks for the other side to attach pump etc!
I was originally intending a few more pockets and probably would if I do it again, but I just couldn't bear to cover any more of the fab fabric! I'm so pleased with how it turned out though and had such fun making it! My Original Twist Em Up Apron cost me nearly £50 - this one less than a fiver! I can't wait to give it test run!

Note: I used around 2m of velcro and half a pack of Heavy Duty Silver Nickle Snaps 15mm. Plus fabric remnants and old clothes!